When you are playing games, being faster than everyone else is super important. Luckily overclocking is an easy solution. Overclocking eliminates a few millisecond response time reducing it to 1ms, which greatly increases your speed and gives you an advantage.
The faster the polling rate and refresh rate of your mouse and keyboard make your move smoother and more accurate. This not only gives you a slight edge over your competition but eliminates room for errors.
Here is how to overclock your mouse and keyboard.
Can you overclock any mouse?
Most newer mice have software for this but if they don’t it has to be capable of a 2K+ polling rate and have mlt04 Microsoft WMO 1.1, IME 3.0, Blue. What that pretty much means is that it cant be a fairly old mouse. Most mice that have been released within the last 10 years should be overclockable.
Can you overclock A Keyboard?
Unfortunately, this is not a thing. Keyboards also have polling rates but you can not overclock just any keyboard. Most keyboards come with software that allows you to change polling rates. You could always try and overclock the USB itself but usually, it just is not worth the trouble and the reward often never becomes anything.
What is Mouse DPI?
DPI stands for Dots Per Second. It is a measurement of the sensitivity of any given mouse. Usually, people stick between 400-1600 DPI, although it is all preference. Think of it this way, the higher the DPI number is, the faster the mouse moves. The lower the DPI is, the slower the mouse movement is. The higher the DPI, the less you need to move your mouse to travel across your monitor.
DPI is not related to the Polling rate but it is important to find your personal DPI settings. Higher is usually not as desirable. Usually, professional players use around 400-800 DPI, but again, it all comes down to what preference you have and the DPI you are best at using.
What is Mouse Polling Rate?
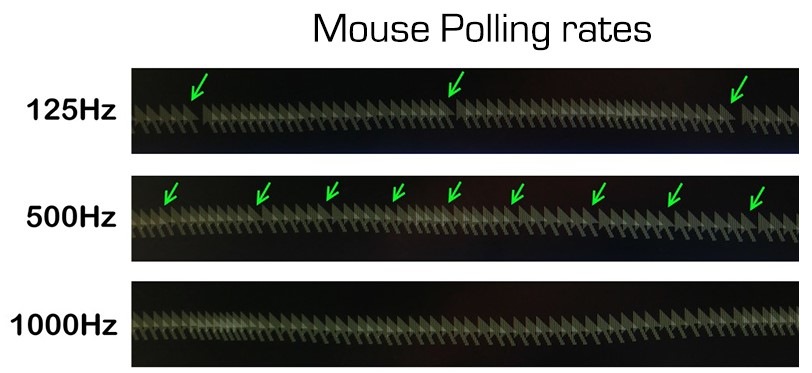
The polling rate is completely separate from DPI. The way it works is essentially like a refresh rate. It is measured in Hz. For example, let’s say you have a polling rate of 1000. That means that every second, your mouse sends information to your computer about where the mouse is 1000 times.
Naturally, the higher the number the more information that your computer gets and the more accurate your aim and the mouse movement are. You could also see it as a refresh rate like on a monitor. The faster the refresh rate, the smoother and more accurate you can be.
Should You Overclock Your Mouse?
So, you may be wondering whether it is worth overclocking your mouse and increasing your polling rate. Well, in all honesty, it doesn’t give you a massive advantage, but if you are one to get as much of an advantage as humanly possible, it can be worth it.
As with overclocking anything, there always come issues. You could fry a USB slot or maybe even your mouse. To be safe and don’t push the limits of your polling rate and you should be safe. These issues only come with wreckless overclocking so be responsible.
How To Check Your Current Polling Rate
Before you overlock your mouse, you can always check to see what your current polling rate is and whether you even need to overclock it. This step is not necessary but you can always check just in case. It is just an extra step to be 100 percent sure that you want to overclock your current mouse.
You can use a website called CPS Check. This will allow you to monitor what Hz your mouse is currently sitting at and help you determine whether you want to overclock or not.
All you need to do is move your mouse back and forth as fast as you can and you will get a reading. It will show you your max refresh rate and what range you are getting.
You can find CPS Check here.
How To Overclock Your Mouse and Keyboard
Step 1.
You will first need to download WinRar to make this possible, don’t worry WinRar is completely free, you can download it here.
Step 2.
Unplug all devices except your mouse and Keyboard. Just in case do not overclock anything else connected. This is just an extra measure to make sure nothing gets damaged.
Step 3.
We next need to reset our USB hubs back to default. You will want to go to your control panel on windows, then go to hardware and sound, select device manager, next click on the drop-down at the top called view, click on devices by connection, and finally find what is called “Intel (R) USB 3.0 eXtensible Host Controller – 1.0 (Microsoft)”
Right-click that option and select uninstall device, if you get a box asking if you want to delete that device, select yes. You then need to restart your computer.
Step 4.
You then need to download this file. This is updated software that will allow you to overlock your mouse. You need to extract this file to your desktop or somewhere you can find it. This is why we had you install Winrar previously.
If you are missing the files named Atsiv.exe, Devcon.exe, Devstate32.exe, and Devstate64.exe, you have an anti-virus activated. You will want to make sure your anti-virus accepts this download.
Step 5.
You want to be in the overlocking mouse polling rate folder. You will then want to find your way to the Sweetlow folder. You will want to right-click the setup.exe and run it as administrator.
You then should see your mouse appear in the list once the software opens.
Step 6.
You want to back out of that area now and find the main area in the folder where all other folders were located. Go to the folder called Mouse Movement Recorder, open it, and open the software. This will show you what your Hz is.
We need to make sure that downclocking works first.
Have that software open to monitor and open the USB Mouse Rate Adjuster Setup that you had opened before. Have these both open.
At the very left of that window, select Filter on Device, select the default drop-down menu to the right of it and select 62.
Select Install Service and then select restart. These options are direct to the right of the drop-down you had just selected.
The Hz range should change in your monitoring software window now to say 62.
Step 7.
If all is well so far, you then want to go back to the main folder with all of the other folders and select the folder called Hidusbf.
Open up the folder named Driver, AMD64, and you can see the different Hz ranges. Usually, 1000 Hz is a good range to shoot for. You can try 2000-4000, but most mice cannot handle 4000-8000.
Step 8.
Select whatever Hz you want and you will want to right-click on the file inside (Should be named hidusbf.sys), copy it, go back to the Atsiv folder and paste it inside that folder.
Step 9.
Go back to the USB Mouse Rate Adjuster Setup software and select a polling rate of 1000, click on install service, restart, and it should apply.
If you want a higher polling rate, you will need to select a 31 polling rate in the software, click on install service, restart, and it should apply.
1000 Hz is plenty and should be what you are aiming for.